Monday, October 31, 2011

What are you making for Christmas?

So, I know today is Halloween, but I started to think about Christmas this past week. I tend to be one of those that decides very last minute that I want to make someone a gift or I find myself buying things just days before. I fully intend on changing that this year.

Here are some of the things I am thinking about that would make nice gifts for friends and family:

I know, another cowl. But love the color! Free pattern HERE
Button Rings! So cute, and a great stocking stuffer. 
DIY clutch. Check out this downloadable pattern.

AND then some ideas for the KIDS

I SPY BOOK: I am going to make this!
Felt fishing set
Adorable doll: Pattern HERE.
Now, I just need to get to work! I have stared working on the grey cowl seen in my previous post. It is coming together nicely and I can't wait to share the finished project!
 
Stay tuned for my earwarmer tutorial. I should have that up in the next couple of days!

Thursday, October 27, 2011

Pinterest Thursday

So, I have a few projects in the works, but I didn't get anything done for Pinterest Thursday. This mostly had to do with my husband being out of town and a teething little one. :)

I thought it would be fun to share some of the things that I have hopes of doing soon. So, here's a look at some of the projects I hope to complete soon:


Yes please! Tutorial here.
Love this adorable bag, especially the button and the fabric choice!
This necklace was supposed to be my project this week!
Really into cowls these days! Love this!
I really want to make up a pattern for this set! And can I get this adorable baby?


These are just a few on my long list of things I want to make. What is inspiring you these days?

Tuesday, October 25, 2011

Crocheted Earwarmer

So, I saw this earwarmer on Etsy and it inspired me to come up with my own pattern for one. It hasn't been too cold for wearing hats in South Carolina, but there have been a few days I have wanted a little bit of coverage on my head, so the earwarmer does the job perfectly!

I first started out with something simple:


But, I decided it needed a little something:


It is a very easy pattern to work up and I'd love any crocheters out there to let me know if they want me to share the pattern! I eventually want to open a pattern shop, but I have yet to create many patterns. So, for now, they are going to be free!

Let me know if you want to try this out for yourself and I'll make a tutorial.


Monday, October 24, 2011

Black Bean Burgers


I found a recipe for these from Jessica Seinfeld's cookbook Double Delicious. I had checked it out from the library and for some reason I did not write down the recipe before returning it. So I tried to remember the basic ingredients and have thus just been making these from memory.

Here's my adapted recipe:

Black Bean Burgers

1/2-1 cup veggies (usually zucchini, corn, tomatoes) sauteed in olive oil
1 egg, beaten
2 cans black beans (or equivalent of cooked beans)
1 cup bread crumbs
salt to taste
1 t. chili powder (optional)
and whatever other spices you want to add
Chipotle Ranch dressing, Marketside brand from Wal-mart (can be found in the produce section because it has to be refrigerated)

Saute the veggies first. Mix the egg, beans, and bread crumbs together. Add additional seasonings. Combine with veggies. Using a mixer, mix thoroughly until it comes together like a paste. Make patties. Cook on a hot iron skillet or in pan. 

We serve these on homemade cornbread and drizzle the dressing on top. The dressing is what makes this so great because it adds a kick of spice and yummy goodness.

I have used a variety of cornbread recipes, but this one I used tonight:

Cornbread

2 eggs, beaten
1 cup kefir (buttermilk or plain yogurt could be substituted)
2 T. agave nectar 
1/4 cup butter
1 cup flour
1 cup cornmeal
2 t. baking powder
1 t. salt

Add dry ingredients and wet ingredients separately. Mix and stir just until wet. Place in greased 8X8 pan. Bake at 350 degrees for 25-35 minutes. 

I like this because even my meat lover husband enjoys these and it easily makes enough for 2 meals for our family. Getting the kids to eat something so good for them always brings me a lot of joy and saving money on making a meatless meal is always a plus!


Thursday, October 20, 2011

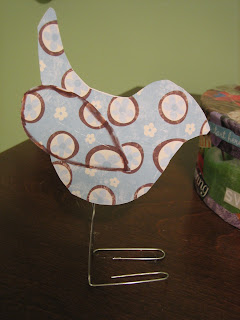
Pinterest Thursday: Scrappy Birds

For this weeks pinterest I made these cute little birds out of scrapbook paper and paperclips.


Aren't they adorable?
This is the link for the tutorial to make this little birds along with the template: Birds 
They would make super cute decorations for a party if you made a whole flock of them. For right now, they will sit on my desk reminding me that winter won't last forever. 


Tuesday, October 18, 2011

Chocolate-Chip Oatmeal Goodness

The other night I was busy doing homework and I suddenly got inspired to make cookies. It had been a long time and it was time to do some baking. They turned out delicious of course and I thought I'd share the recipe. I like to make healthier baked goods, so the recipe actually isn't too bad for you. If you are one of the individuals who cringes at the thought of "healthy" food, well I challenge you to try making these cookies. You'd be surprised how good they taste.


The Recipe:
Chocolate Chip Oatmeal Cookies
Cream together:
3 sticks of butter
1/4+1/8 cup of Peanut Butter
3/4 cup Honey
3/4 cup Sucanat
3 Eggs
1 1/2 tsp Vanilla
Add:
2 1/4 cup of Whole Wheat Flour
1 1/2 tsp Baking Soda
3/4 tsp Salt
3 cups Rolled Oats
1-2 cups Chocolate Chips

I've enjoyed eating them and sipping cups of Bengal Tea on chilly nights. 


Monday, October 17, 2011

Crochet Headband: Tutorial


Sweet and Simple Flower Headband
for 17-17.5 in. head (roughly 1-2 years of age)
This pattern can be easily modified for an adult size, but the tutorial I am sharing today is for a small toddler.
Notes:
I have been in the process of creating several styles and patterns for headbands and am excited to be sharing my very first pattern/tutorial with you. 
The main thing I wanted to accomplish with this pattern, was to create something that could be adjusted due to yarn stretching out over time. I also didn't want to deal with long ribbons or ties on small children, so I came up with the simple button closure that I think works great for this age group. 
If you are just a beginner at crochet, this is a great project because it is super easy and fast to complete.


Terms:
ch: chain
sl st: slip stitch
sc: single crochet
hdc: half double crochet
dc: double crochet
*edc: extended double crochet 
flo: front loop only
blo: back loop only


*yo (yarn over), insert hook through stitch, pull through, yo, pull through one loop, yo, pull through 2 loops, yo, pull through remaining 2 loops.


Hook Size: I/5.50 mm
Yarn: Sugar n' Cream 4ply 100% cotton


Headband:
Chain 61 (this should be roughly 17 in. long, but you may need to check your gauge and add or decrease according to the size you want the headband to be)


Sc in ch60 space (or 2nd chain from the end), ch1, skip next stitch, sc in following stitch, ch1, skip next stitch, sc in following stitch (Here you are creating the button holes), sc in next 4 sts. 


Ch 40


Sc in remaining 10 st, finishing at the beginning ch.


Finish off, weave in loose ends.


Sew a small button onto opposite side from buttonholes.


Flower:
Source: Ravelry free pattern
Disclaimer: This is not the complete pattern as I found it, but only the part I used.


Ch2


Rnd 1; Work 5 sc in first ch, sl st in front loop only of first sc to join.


Rnd 2: Work (sc, ch1) in flo of same st, *(sl st,sc, sl st) in flo of next sc; rep from * around, sl st in remaining back loop only (blo) of first sc from rnd 1. 


Rnd 3: *Ch 2, sl st in blo of next sc; rep from * around ending sl st in first ch-2 sp.


Rnd 4: Work 4 hdc in same ch-2 sp, *(sl st, 4 hdc) in next ch-2 sp; rep from * around ending sl st into back center st (see Notes) of first petal.


Rnd 5: *Ch 3, sl st into back center st of next petal; rep from * around ending sl st in first ch-3 sp. 


Rnd 6: Work (hdc, 4 dc, hdc) in same ch-3 sp, *(sl st, hdc, 4 dc, hdc) in next ch-3 sp; rep from * around ending sl st into back center st of the first petal.
Rnd 7: *Ch 4, sl st into back center st of the next petal; rep from * around ending sl st in first ch-4 sp.
Rnd 8: Work (hdc, 6 edc, hdc) in same ch-4 sp, *(sl st, hdc, 6 edc, hdc) in next ch-4 sp; rep from * around ending sl st into back center st of the first petal.

Finish off. Leave long strand for attaching to headband.


Use strand from flower to weave onto headband, finish off.


And you are done!


Please let me know if you have any questions. Would love to see the finished product if anybody completes this. 


Thanks!


Krista 

Thursday, October 13, 2011

Pinterest Thursday: Fabric Covered Buttons

Oh my word, this is so easy!

First of all, in order to do this little project, you need a button kit. These are like super cheap, and you can find them at Wal-mart (even better!). So, next time you are there, look in the crafty section for them. 

This is what you get:

5 buttons, backs, and the little push tool to cover them


Okay, so open your packet up, cut some cutesy fabric like so,


use your little "push" tool (the packet comes with instructions),


and....voila!....you have a super adorable button.


This is so easy that I seriously did this one button in like 2 minutes or less....and I blogged it while my kids ate their after nap snack. So, what are you waiting for? Go get some buttons!

You can use them for lots of things: buttons for clothes, button earrings, flower embellishments, etc...

Thursday, October 6, 2011

Pinterest Thursday: Paperclip Earrings

It's my (Stephanie's) turn for Pinterest Thursday and I picked a project from my board to make. I chose paperclip earrings. They are actually so simple to make and lots of fun.

Aren't you excited?

 I used these materials:


1. Open paper clip and form into a triangular shape, then glue open side together.


2. Wrap string all the way around the paper clip triangle (make sure to glue string to paperclip) 
Then just wrap the string randomly to get a cool design
Add earring hooks
and...
Wah-Lah
a new pair of super cute earrings!


You should definitely try this. It doesn't take long at all, they are very inexpensive and did I mention cute? Keep Pinning. 


Monday, October 3, 2011

Headbands!

My recent obsession in the world of crochet is making headbands. They are a great way to add some color to your wardrobe.


So, the knotted headband I got from this tutorial and I am loving it. If you know anything about crochet, definitely check it out. If you don't and want to buy one...we will be selling them in the shop. They will be made to order, so if you are interested shoot us an email. All other headbands will also be available. Flowers, buttons, 2 strands, 3 strands, thin, thick, blue, pink...you name it.

I am going to be working up a pattern/tutorial for the flower headband that should be coming to you tomorrow or the next day. :)